
Liberating a ThinkPad T480 With Libreboot
Free software is great. Let’s be honest with ourselves, a huge portion of our essential infrastructure is built off of free and open source software, be it Linux, GCC, ffmpeg, OpenSSL, and many, many more. This is, in my opinion, awesome, because if the user so chooses to prioritize freedom and control, they have a seemingly real option to. Well, it turns out, only to some extent, in most cases. Intel and AMD, along with some flavors of ARM silicon, are horrendously closed off to the public, and the user has very little control over their own firmware. Specifically in the case of Intel, since 2008, they have included the Intel Management Engine (IME), a means of remote “Ring -3” management. Moving past the… controversial terminology of “Ring -3”, what this means is that there is an independent computing environment that the end user has no knowledge of and no control over that, in turn, has arbitrary remote control of your machine, including things such as inspecting memory and connecting to other computers. Past this, it ensures that only OEM firmware is accepted via something called Intel BootGuard, forcing users to use non-free, non-auditable firmware that’s doing who-knows-what on their machine. Some go so far as to conjecture these to be backdoors, which while disputed by Intel, has not been substantially proven otherwise. Enter Libreboot - a free alternative to this proprietary, closed-source foundation of computing. While it doesn’t fully expose the inner workings of your CPU (and thus isn’t necessarily akin to knowing there isn’t a backdoor, as shown in this Phrack article), it enables far more user control than what’s enabled by default in an auditable manner.
Background
But Didn’t You Just Rant About BootGuard?
Libreboot largely is restricted to platforms where BootGuard was not enforced. However, with the discovery of
CVE-2017-5705, Intel CPUs on MEv11 are vulnerable.
Mate Kukri built a tool called deguard that exploits this vulnerability, allowing for the disabling of
BootGuard and for tools such as meclean to be run. While this isn’t as good as the problem not existing in
the first place, it’s the next best thing. Huge props to Mate Kukri and the Libreboot team, as it’s the only
reason that we are able to use Libreboot on the T480. Additionally, as a reminder, while this is in the strictest
sense a vulnerability, you, as the end user, can mitigate it yourself once you’ve taken advantage of what it can
do for you, on your own hardware. For more information on this, click here.
So Why a T480?
I picked the T480 because it’s a fairly potent and modular platform. My personal machine has an i7-8650U, with the ability to add and remove my own RAM as I please. Similarly, storage is also modular.
The specs of the laptop are as follows (requirements marked with [X] ):
- Lenovo ThinkPad T480 [X]
- 16 GB DDR4 2400 MHz RAM - Replaced with a 2x16 G.Skill RipJaws 32 GB DDR4-2400MHz kit
- ALFA AWUS036ACS - While not Free, highly compatible and removable at will without disassembly
- Samsung 990 EVO Plus 1 TB M.2
Additional components:
- Raspberry Pi Pico [X] - Needed to flash firmware, any Raspberry Pi will do though
- SOIC8 Clip [X] - I recommend the Pomona one, although it is more expensive
- Void Linux install [X] - any distro will work, I just have to shill Void
- Thumb Drive [X]
Librebooting: A Process
“A Journey of a Thousand Hours Begins With a Single Misstep”
Before one even begins, they must make some decisions. First and foremost - do we want GRUB, SeaBIOS, or both? To further elaborate, GRUB is a bootloader, SeaBIOS allows for a more traditional legacy BIOS system, and SeaGRUB is the default Libreboot payload that enables both, where SeaBIOS will load GRUB on boot. In my opinion, practically only either the GRUB or SeaGRUB payloads are worth it, as the former enables faster booting, and the latter adds on easier support for livebooting and a more traditional BIOS experience, so to speak. Personally, I have elected to use SeaGRUB, and notably, both allow for true full disk encryption. Of additional note, the GRUB-only payload requires different configuration. Furthermore, one must decide if they want to enable HyperThreading. For those unfamiliar, this is Intel’s method of allowing multiple threads per-core. It can improve performance in certain workloads, but also opens you up to branch-prediction vulnerabilities like Meltdown and Spectre. Please carefully consider your choices after reading more about it here. We will keep it disabled, even though I regularly have to bootstrap GCC (where it can actually be beneficial), simply because I don’t think that the perf boost there will really be worth the security failings it presents.
Once we’ve made our decisions, it’s time to begin the fun. We will use multiple sources to proceed through the process, because while thorough, the Libreboot documentation can be quite confusing. Thanks to Libreboot, Device Casting Couch (…interesting name), and m4iler for their guides. We will primarily follow DCC’s walkthrough, with addendums from m4iler and Libreboot’s documentation when relevant.
Part 1: Configuring Before You Configure
Flashing LibreBoot only works with some extensive preparation, lest you otherwise brick your machine. We begin by first going into the BIOS, and changing the following settings:
- /Config/Thunderbolt BIOS Assist Mode - DISABLED
- /Security/UEFI BIOS Update Option/Flash BIOS Updating by End-Users - ENABLED
- /Security/UEFI BIOS Update Option/Secure RollBack Prevention - DISABLED
- /Security/UEFI BIOS Update Option/Windows UEFI Firmware Update - DISABLED (optional, but why would you run Windows if you’re doing all this?)
- /Security/Secure Boot/Secure Boot - DISABLED
- /Startup/”UEFI/Legacy Boot” - BOTH
- /Startup/”UEFI/Legacy Boot”/”UEFI/Legacy Boot Priority” - LEGACY FIRST
- /Startup/”UEFI/Legacy Boot”/CSM Support - YES
After doing all of this, save your changes and restart the machine.
Notably, Thunderbolt BIOS assist mode isn’t explicitly mentioned on the Libreboot site, as far as I could find, but makes sense in the context of the information available, since Thunderbolt on the T480 has some issues, which will be discussed later. Most, however, are explicitly mentioned, such as Secure Rollback Prevention, Flash BIOS Updating, Secure Boot, and enabling Legacy + CSM boot, just further down the page under “Update Lenovo Firmware First”.
Part 2: More Configuration
Now that the target machine is ready (kind of - more on that in a bit), we’re going to move to our Linux install to start preparing the firmware and final changes for our target machine. While not mandatory, it’s highly encouraged to make a temporary directory for all of this to go in, as there’s quite a bit to install. Once you have such a directory, we begin by initially installing the specific BIOS version Libreboot mandates from Lenovo, which is discussed here and can be found here. This MUST be done in order to facilitate Libreboot - otherwise it will not work.
At this point, we use geteltorito to extract image data from the iso file, as:
geteltorito -o t480_bios_update.img /path/to/your/downloaded.iso
Then, write it to your flash drive using dd:
sudo dd if=t480_bios_update.img of=/dev/<USB> bs=4M conv=fsync status=progress
You can enumerate the name of your USB using the lsblk command. Please replace “<USB>” with that name in order to actually write to the drive.
Once complete, simply boot into the USB drive on your T480 and roll back your BIOS to the version you just downloaded using the “Update BIOS” function.
Lenovo will naturally give you several different pop-up warnings about this, but just keep proceeding until this version is flashed. Of course, as with
all BIOS flashes, you should have your device plugged in and in a safe place such that it does not turn off. Otherwise, you will brick your laptop.
Once this is complete, return back to your Linux install. If it is not installed, install the git version manager, as it is required in the next steps of
preparation. Once it is installed, or if it is already installed, it is encouraged that you configure it with the following, presuming you have not already configured git:
git config --global user.email = "johndoe@example.com"
git config --global user.name = John Doe
At this point, we will now retrieve the Libreboot lbmk tool from here using:
git clone https://codeberg.org/libreboot/lbmk
lbmk, also known as Libreboot-Make, is the core build system of Libreboot. We will continue to use it to prepare for
the flash. Once it is installed, move into its directory, and type:
export XBMK THREADS=<N>
Where N is the number of threads you have available. Once this is done, we will install dependencies for your specific operating system. At the moment, Debian, Ubuntu, Mint, Pop!_OS, Fedora, Arch/Parabola, and Void are supported. While dependencies can be installed on other distributions, one will have to write their own script to do so. This is done with:
sudo ./mk dependencies <distro>
In my case, I’m on Void, so it is sudo ./mk dependencies void. Once dependencies are installed, we must build the flashprog utility, which is what
gets used to actually flash the chips.
./mk -b flashprog
Notably, those of you also on Void may run into some dependency issues here, as not all dependencies are in fact satisfied with the installer. Particularly, pay attention to what you are using to flash your chips - if you are using a Pico, you can disable the requirement on the dependencies. I cannot say for sure on anything else.
Once complete, we now need to download a release of Libreboot from one of the available mirrors. At the time of writing, the options are:
- https://mirror.math.princeton.edu/pub/libreboot/ (Princeton university, USA)
- https://mirror.shapovalov.website/libreboot/ (shapovalov.website, Ukraine)
- https://www.mirrorservice.org/sites/libreboot.org/release/ (University of Kent, UK)
- https://mirrors.mit.edu/libreboot/ (MIT university, USA)
- https://mirror.koddos.net/libreboot/ (koddos.net, Netherlands)
- https://mirror-hk.koddos.net/libreboot/ (koddos.net, Hong Kong)
- https://mirror.cyberbits.eu/libreboot/ (cyberbits.eu, France)
As an aside, if you or your organization are interested in hosting a mirror yourselves, this Libreboot page contains information on how to do so.
The most up to date variant at the time of writing is version 25.06 in the stable directory. We will proceed with that, but for those attempting
to replicate this in the future, please be aware of new versions. We will navigate to the roms subdirectory, then, since we are using a Raspberry
Pi Pico for this, we will look for libreboot-25.06_serprog_pico.tar.xz. Install this and extract it.
At this point, press down on the “Boot Select” button on your Pico, then plug it into your machine. In the data you have just extracted, enter
the serprog_pico folder, copy serprog_pico.uf2, and copy it onto your Pico. After waiting for the Pico to flash itself with this data, run the
dmesg command to investigate the name of the device, listed as something like <NAME>: USB ACM device.
Part 3: Preparing to Flash the T480
We will now begin working with the T480’s firmware. Navigate back to the roms subdirectory, and find the T480-specific tarball. Download this file.
At this point, we need to inject vendor files into the tarball. Here, we are presesnted with our first choice. Upon injection, we can either choose
to have a randomized MAC address or set a custom one (recommended), or continue with your device’s default (not recommended). The reason this isn’t
recommended is it enables networks that you connect to to more adequately pin down what device you are using, which can be used to identify an individual.
Past this, one should always be spoofing their MAC address such that each time you connect to a network, a different MAC is provided, but that moves beyond
the scope of this post. In order to set a random MAC address, inject your vendor files with:
./mk inject libreboot-25.06_t480_vfsp_16mb.tar.xz
For a custom MAC (replace the dummy one with your desired MAC):
./mk inject libreboot-25.06_t480_vfsp_16mb.tar.xz setmac 01:23:45:67:89:AB
To continue with the default address, use:
./mk inject libreboot-25.06_t480_vfsp_16mb.tar.xz setmac keep
Naturally, replace the version information with whatever version you are using. These instructions are valid for any version past 20241206R8.
Part 4: Flashing the T480
We first revisit the earlier aside on the Thunderbolt problems with the T480. With this model of laptop, there is a bug in which errors and debug information are written to the firmware’s own flash storage, eventually causing it to fill up. This, in turn, causes Thunderbolt to stop working, impacting features such as fast charge. Since there is an update that prevents this issue, we will first take care of this by updating the Thunderbolt firmware. In order to do this, we turn off and partially disassemble the laptop to this point:
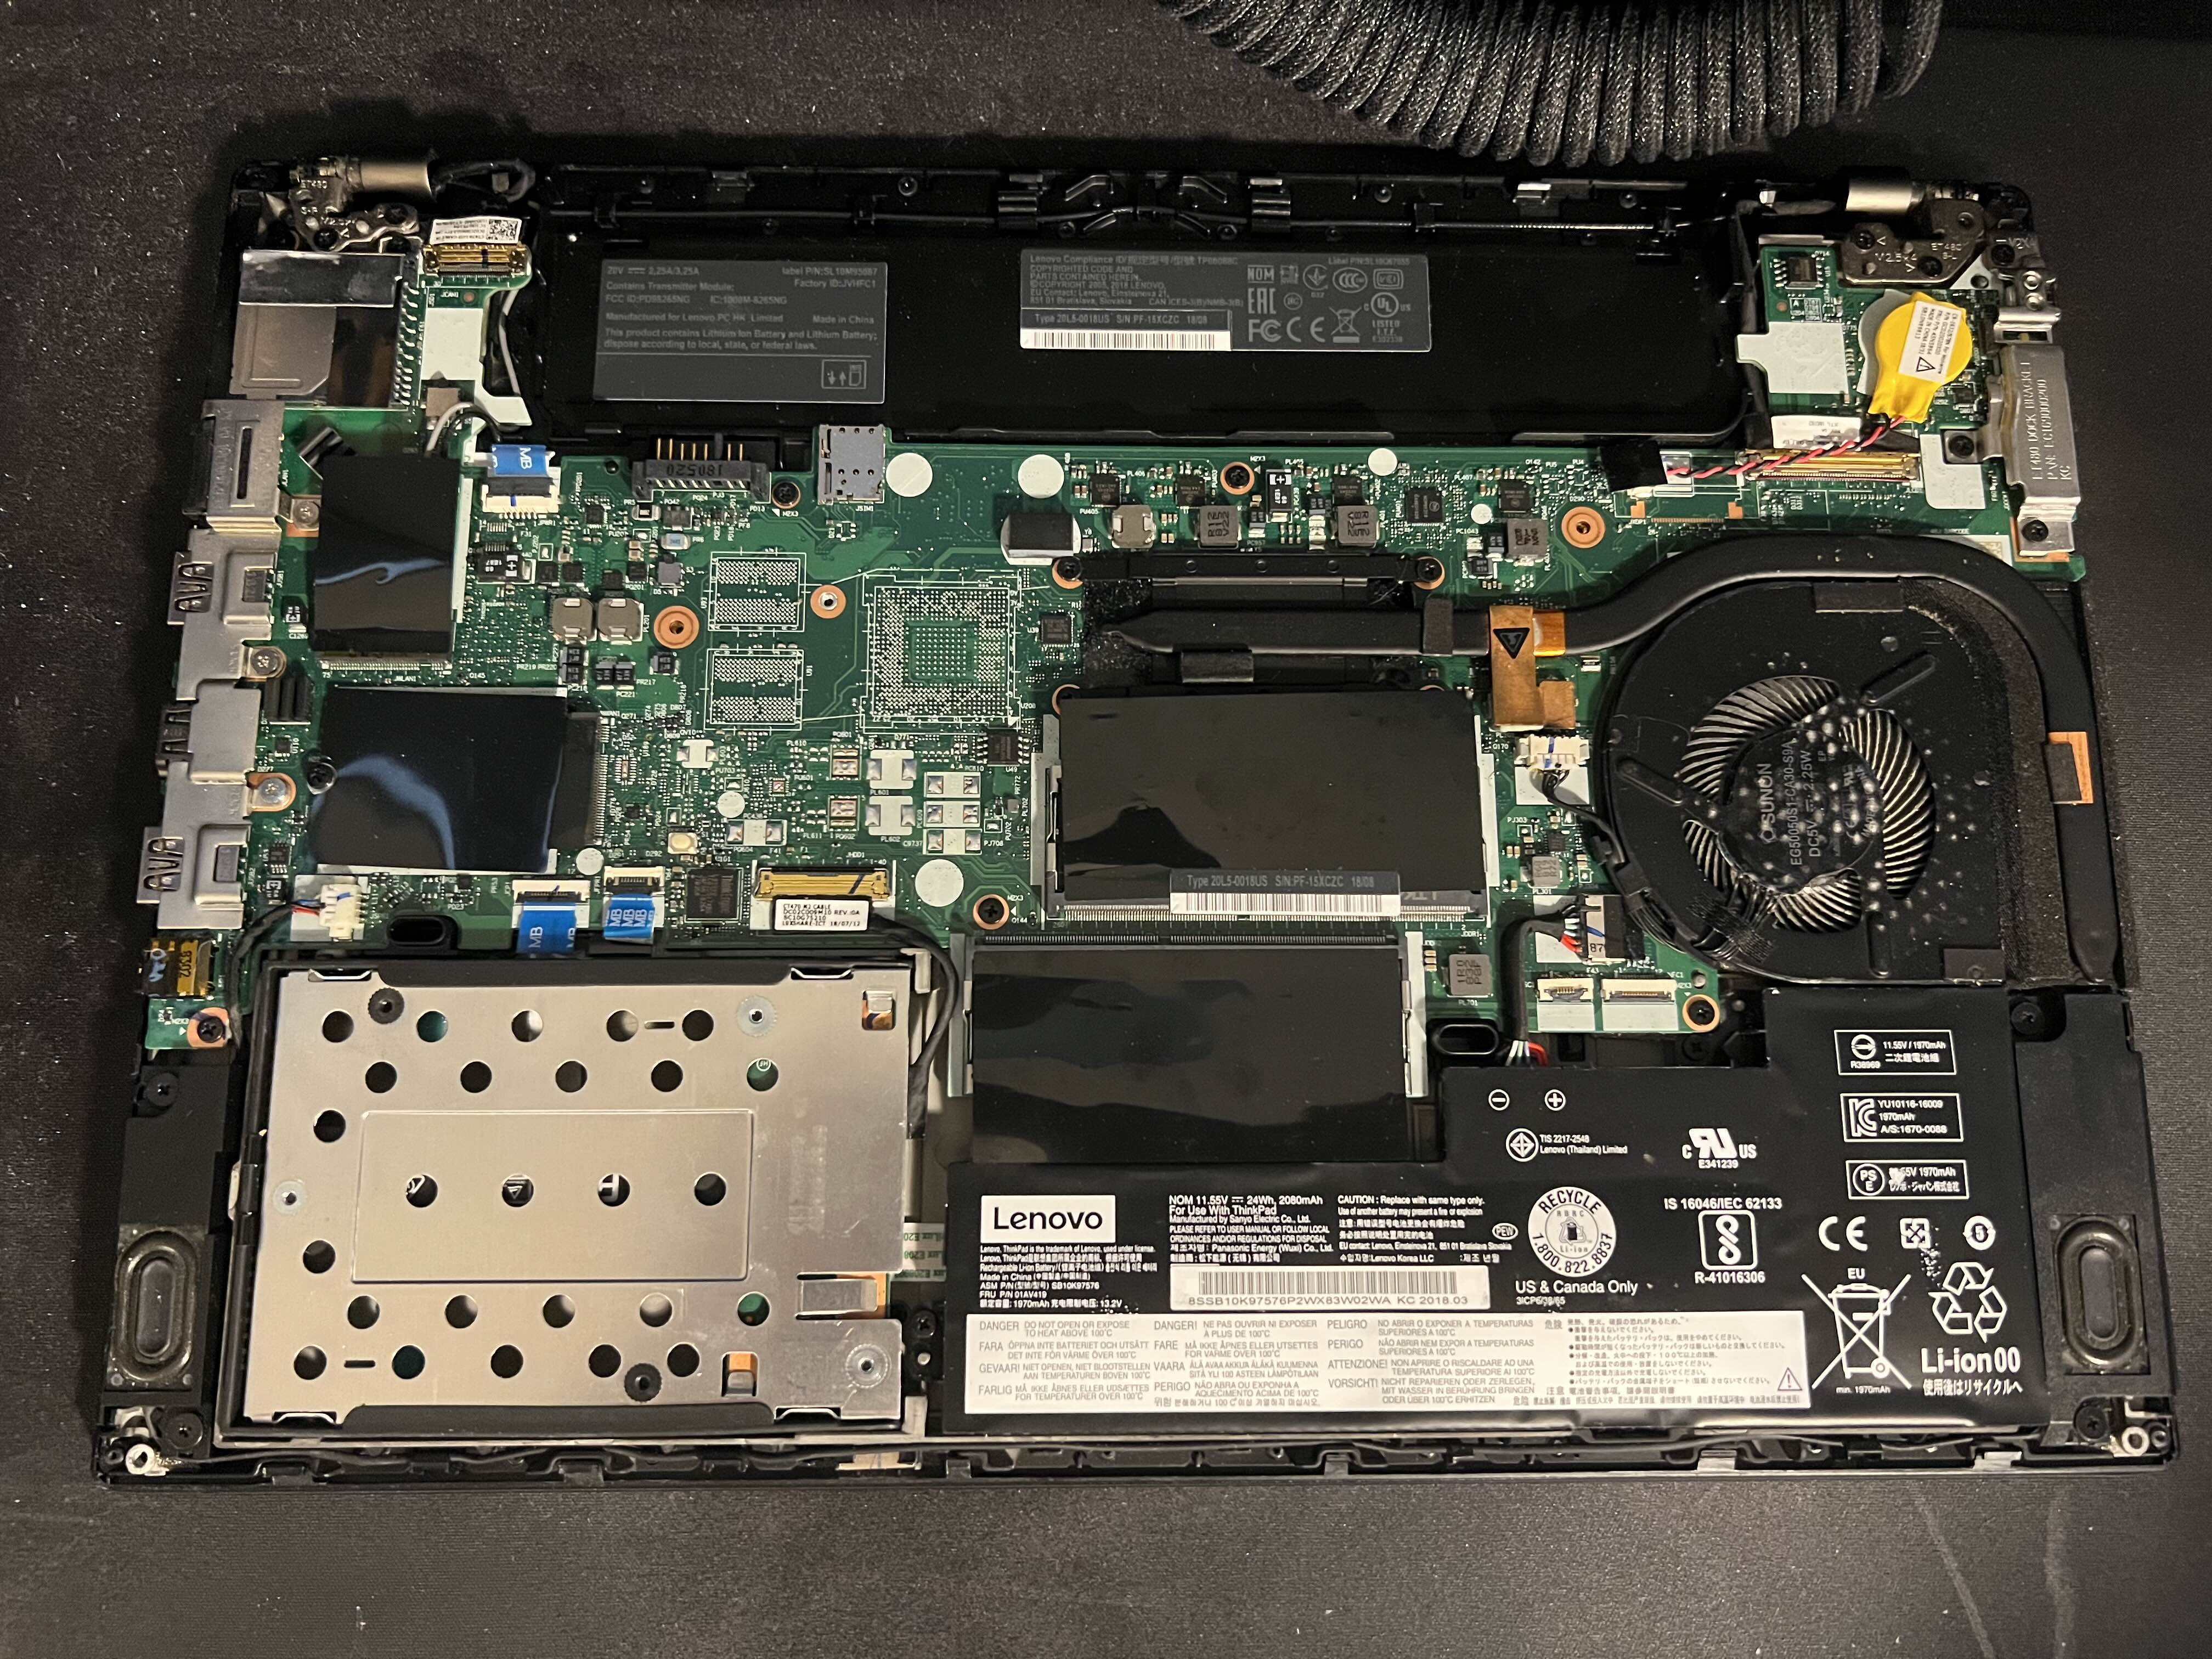
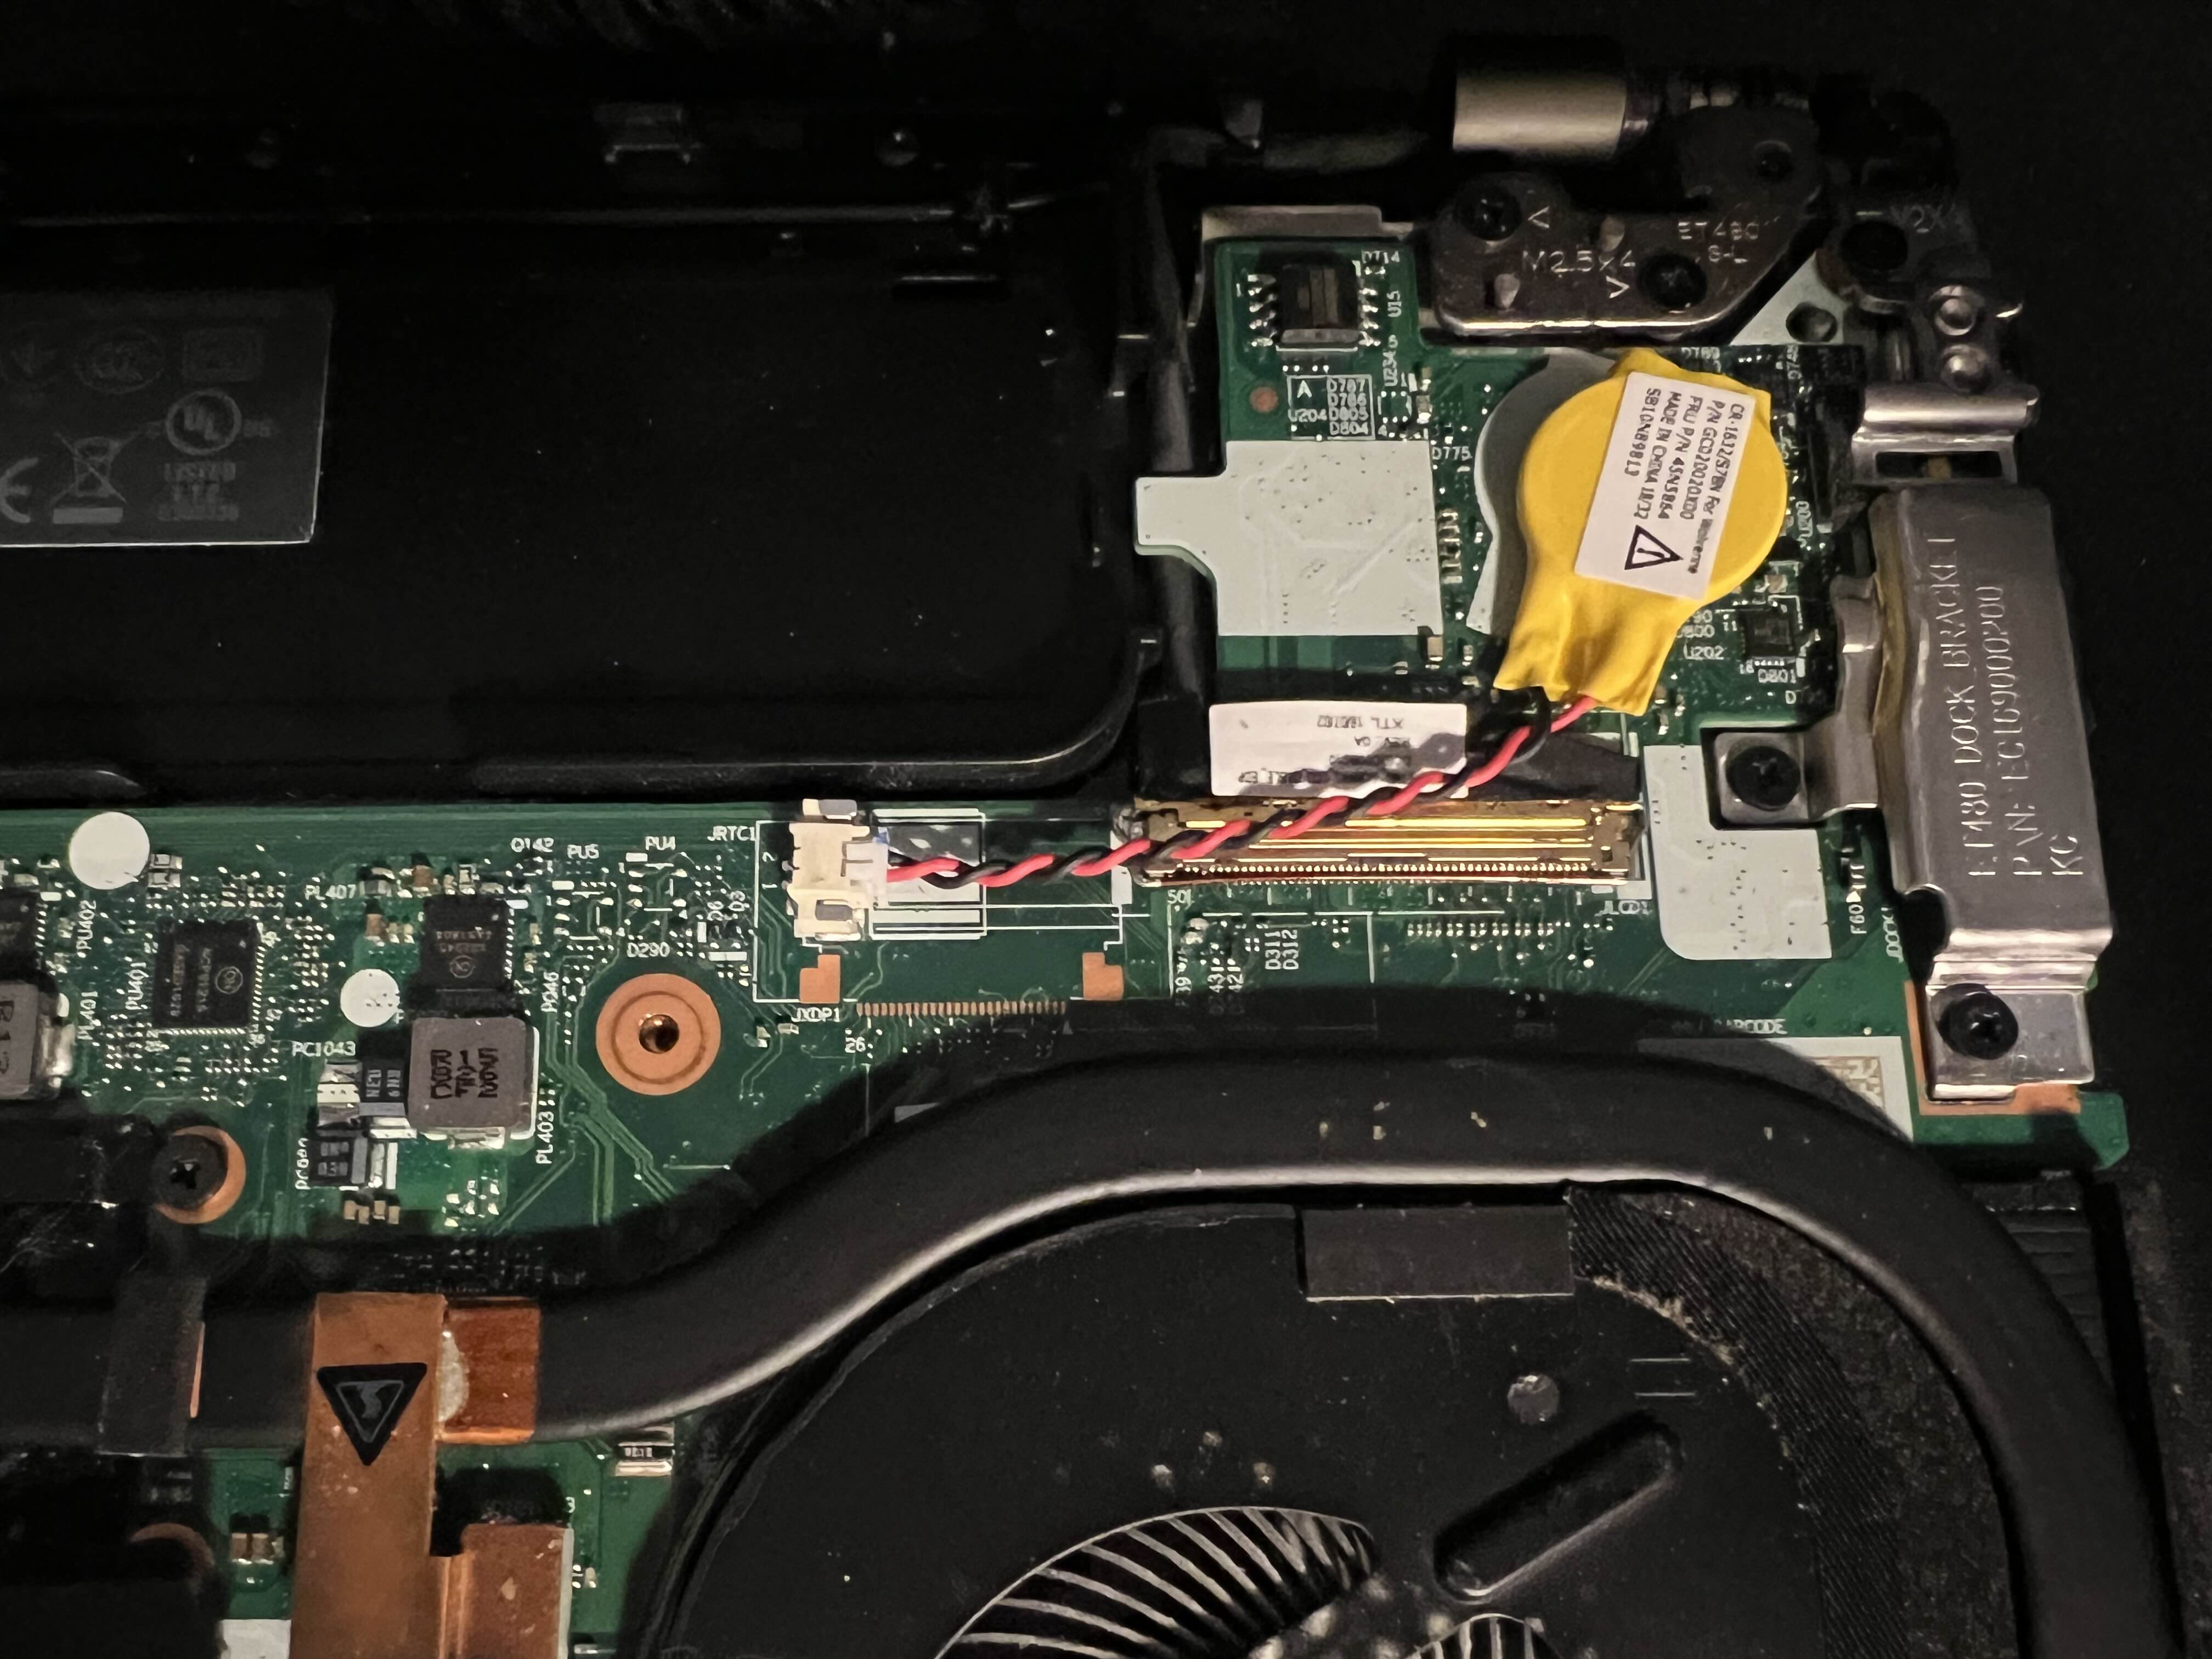
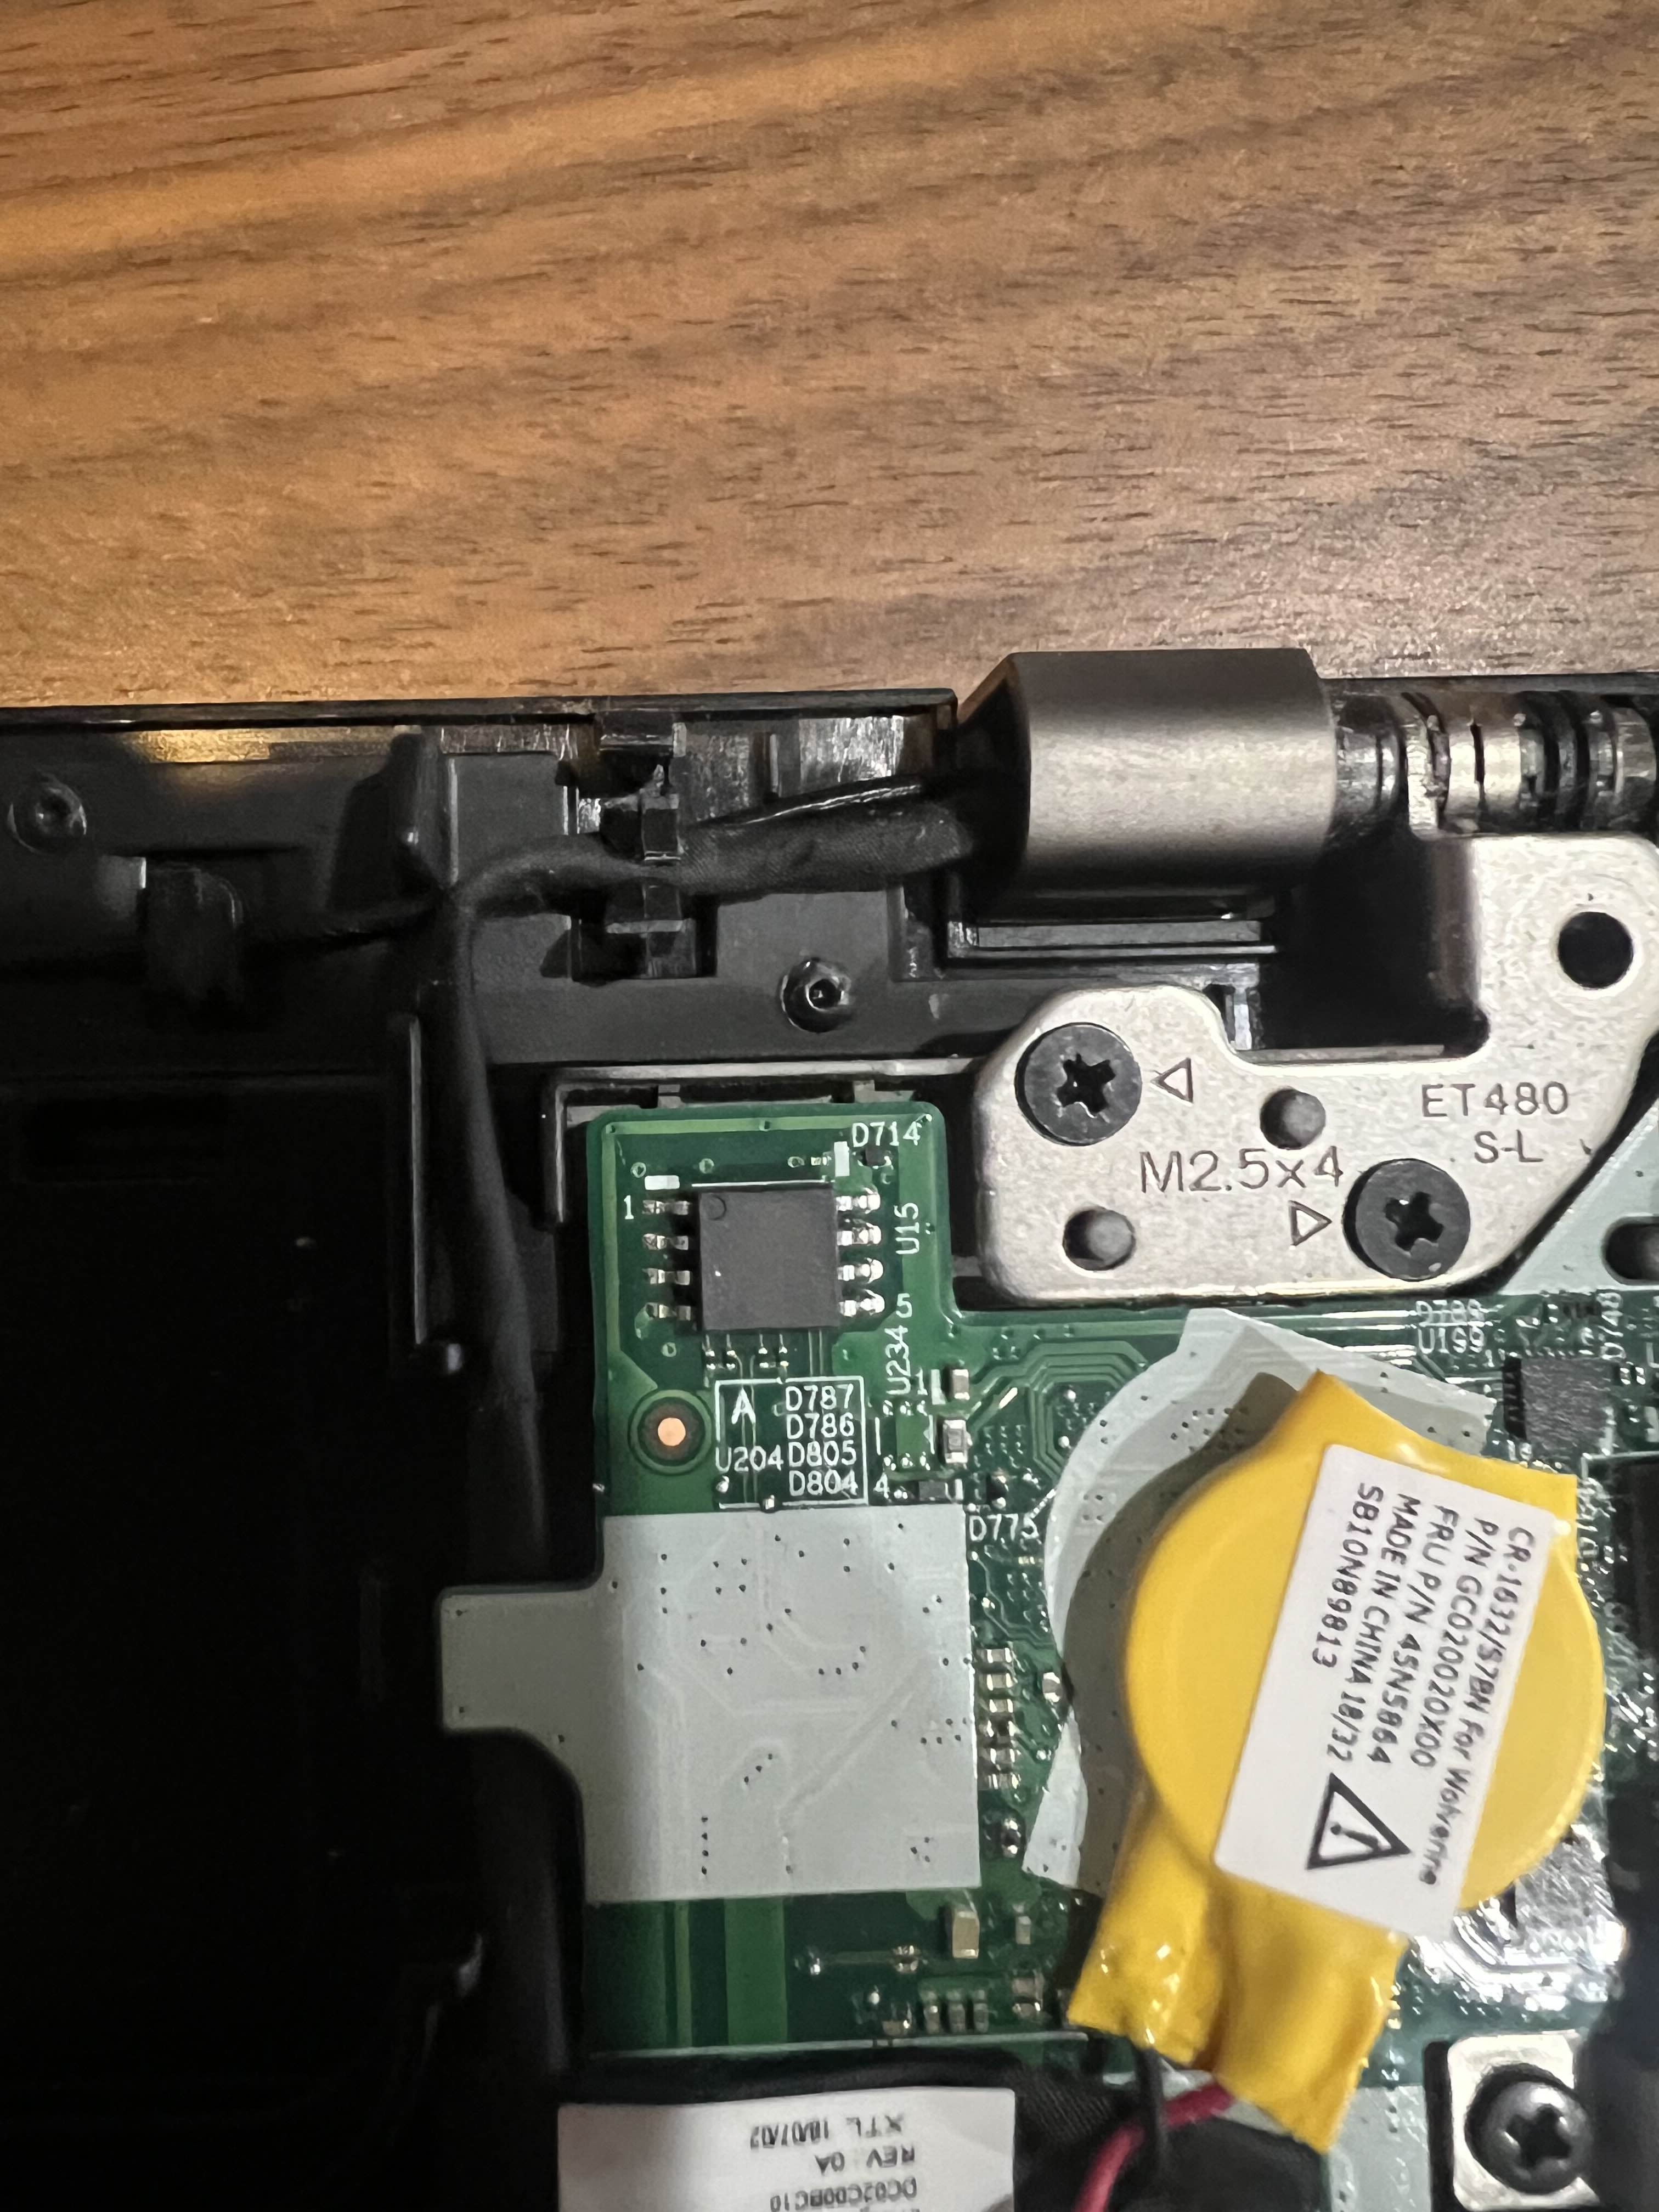
Once at this stage, we will unplug the two internal batteries, both the coin battery:
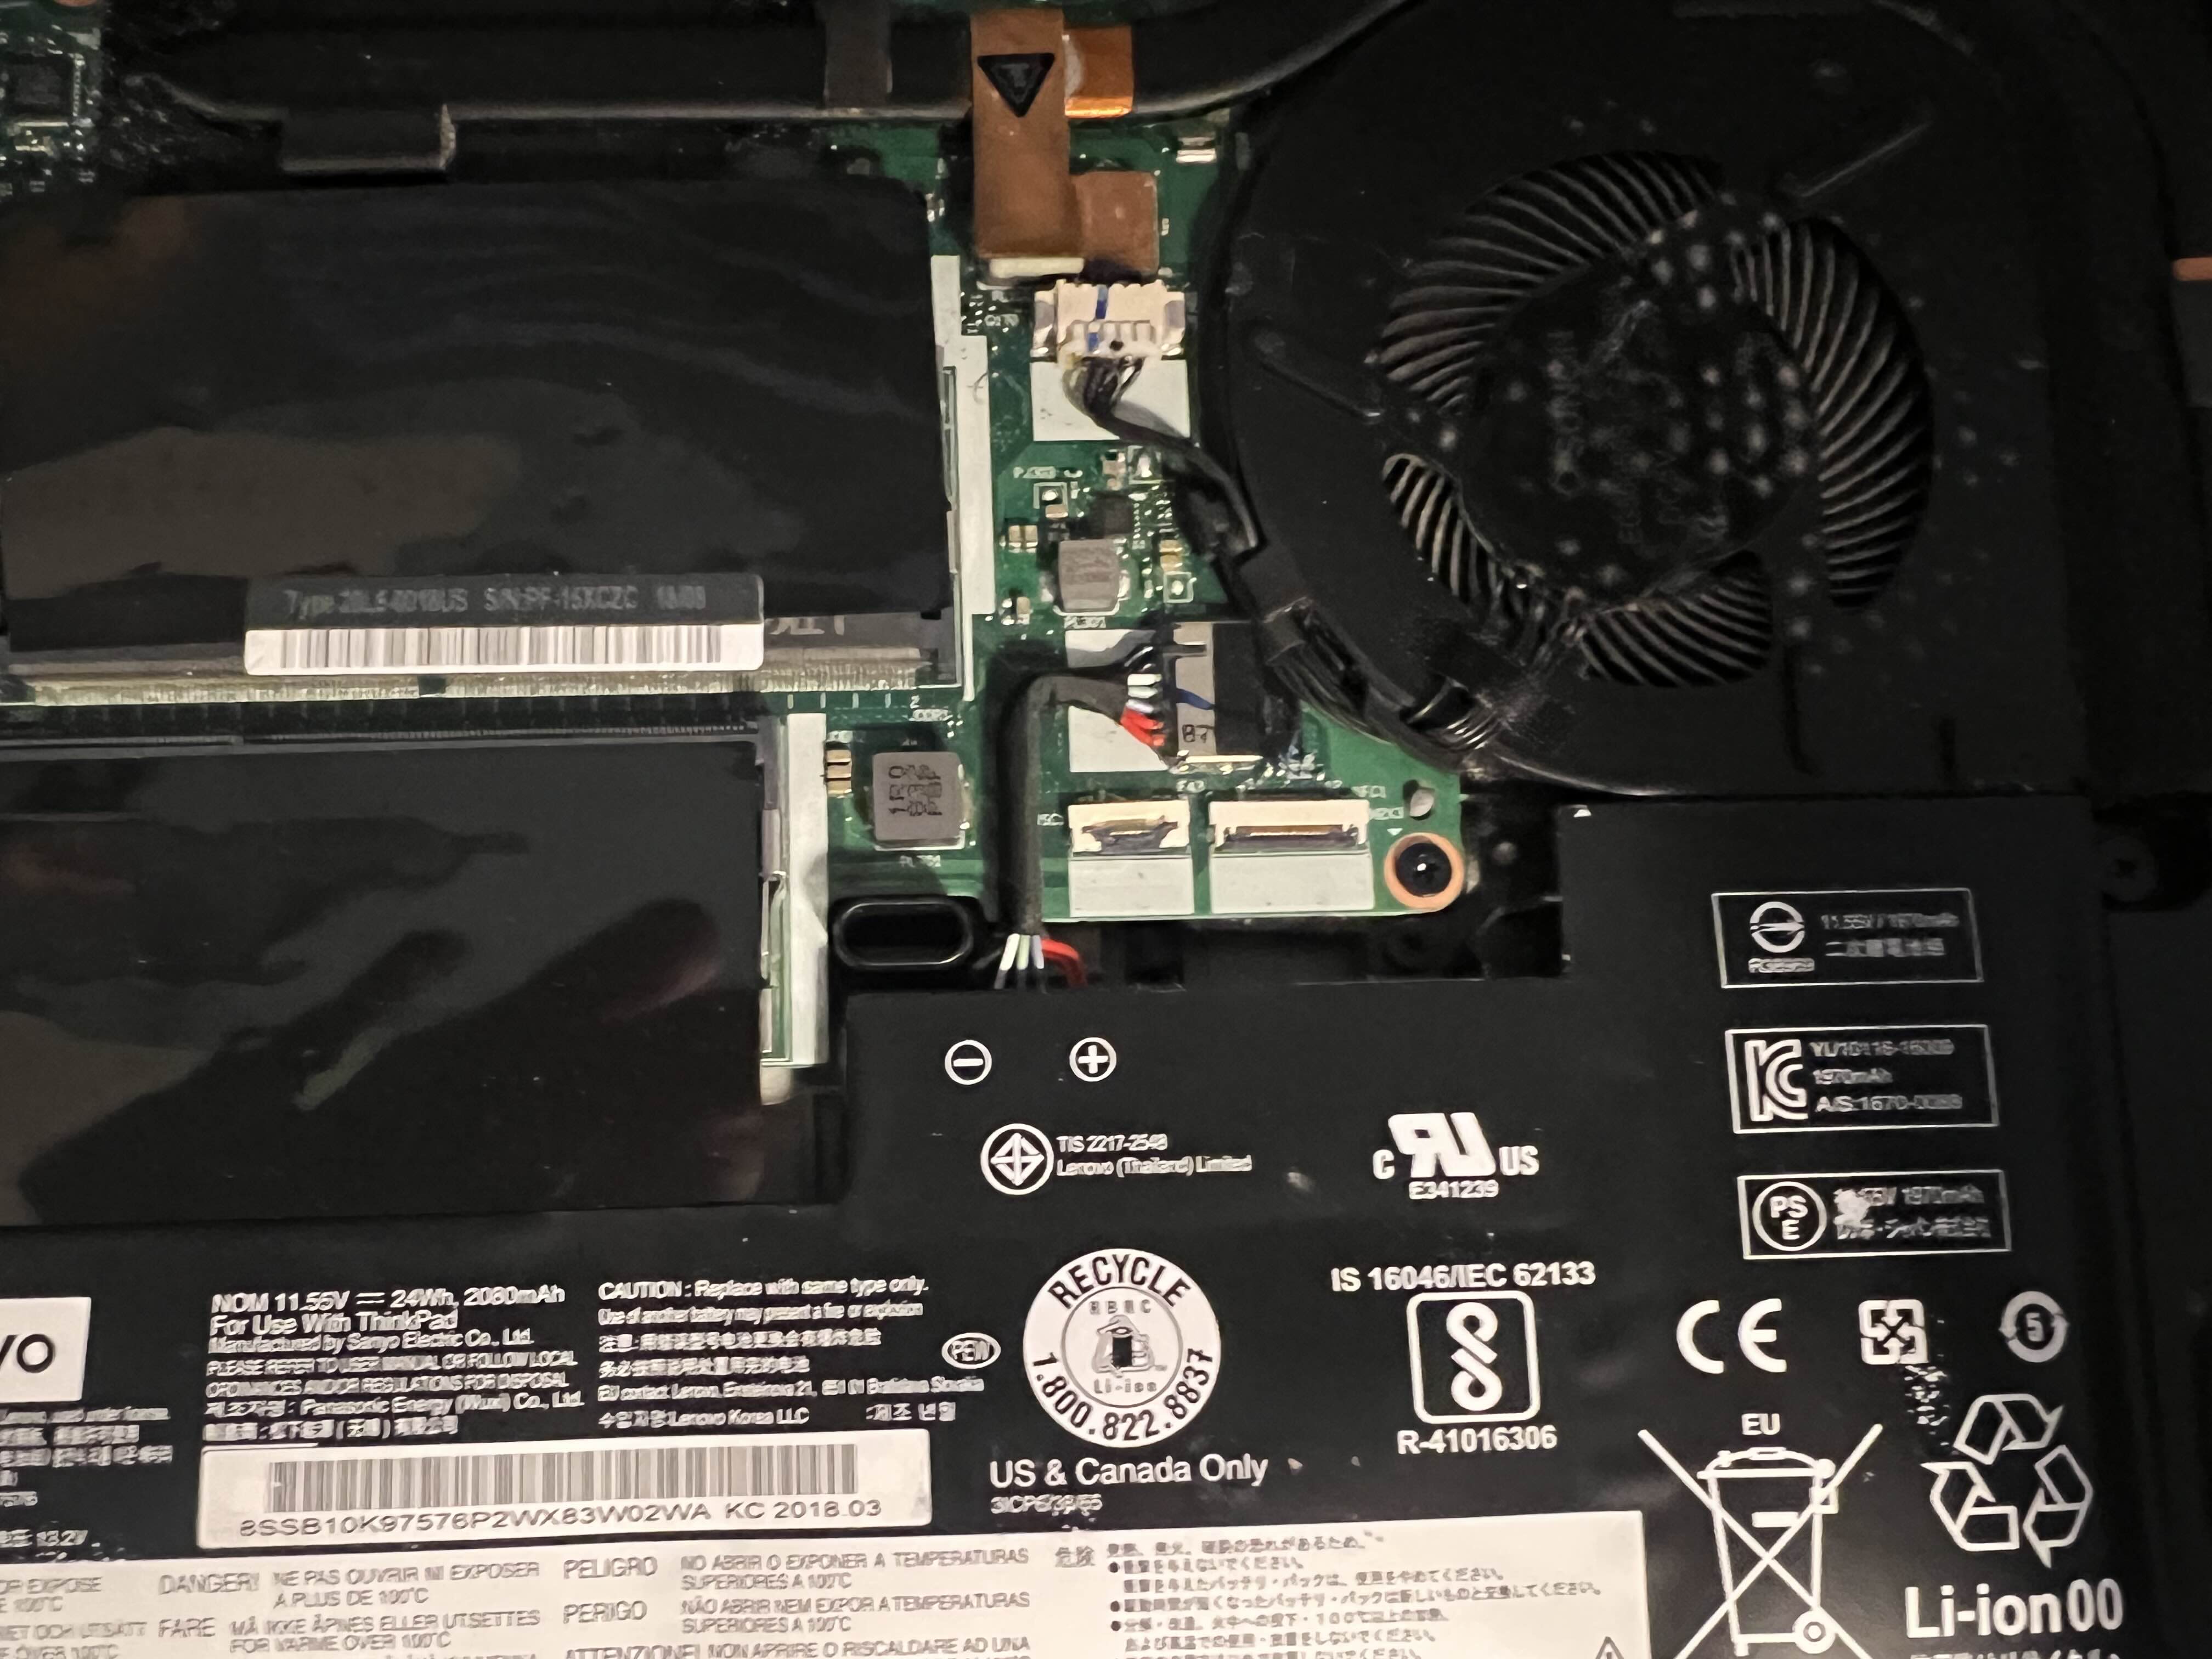
and the main battery:
Once this is done, wire your Pico together with your SOIC8 clip as such:
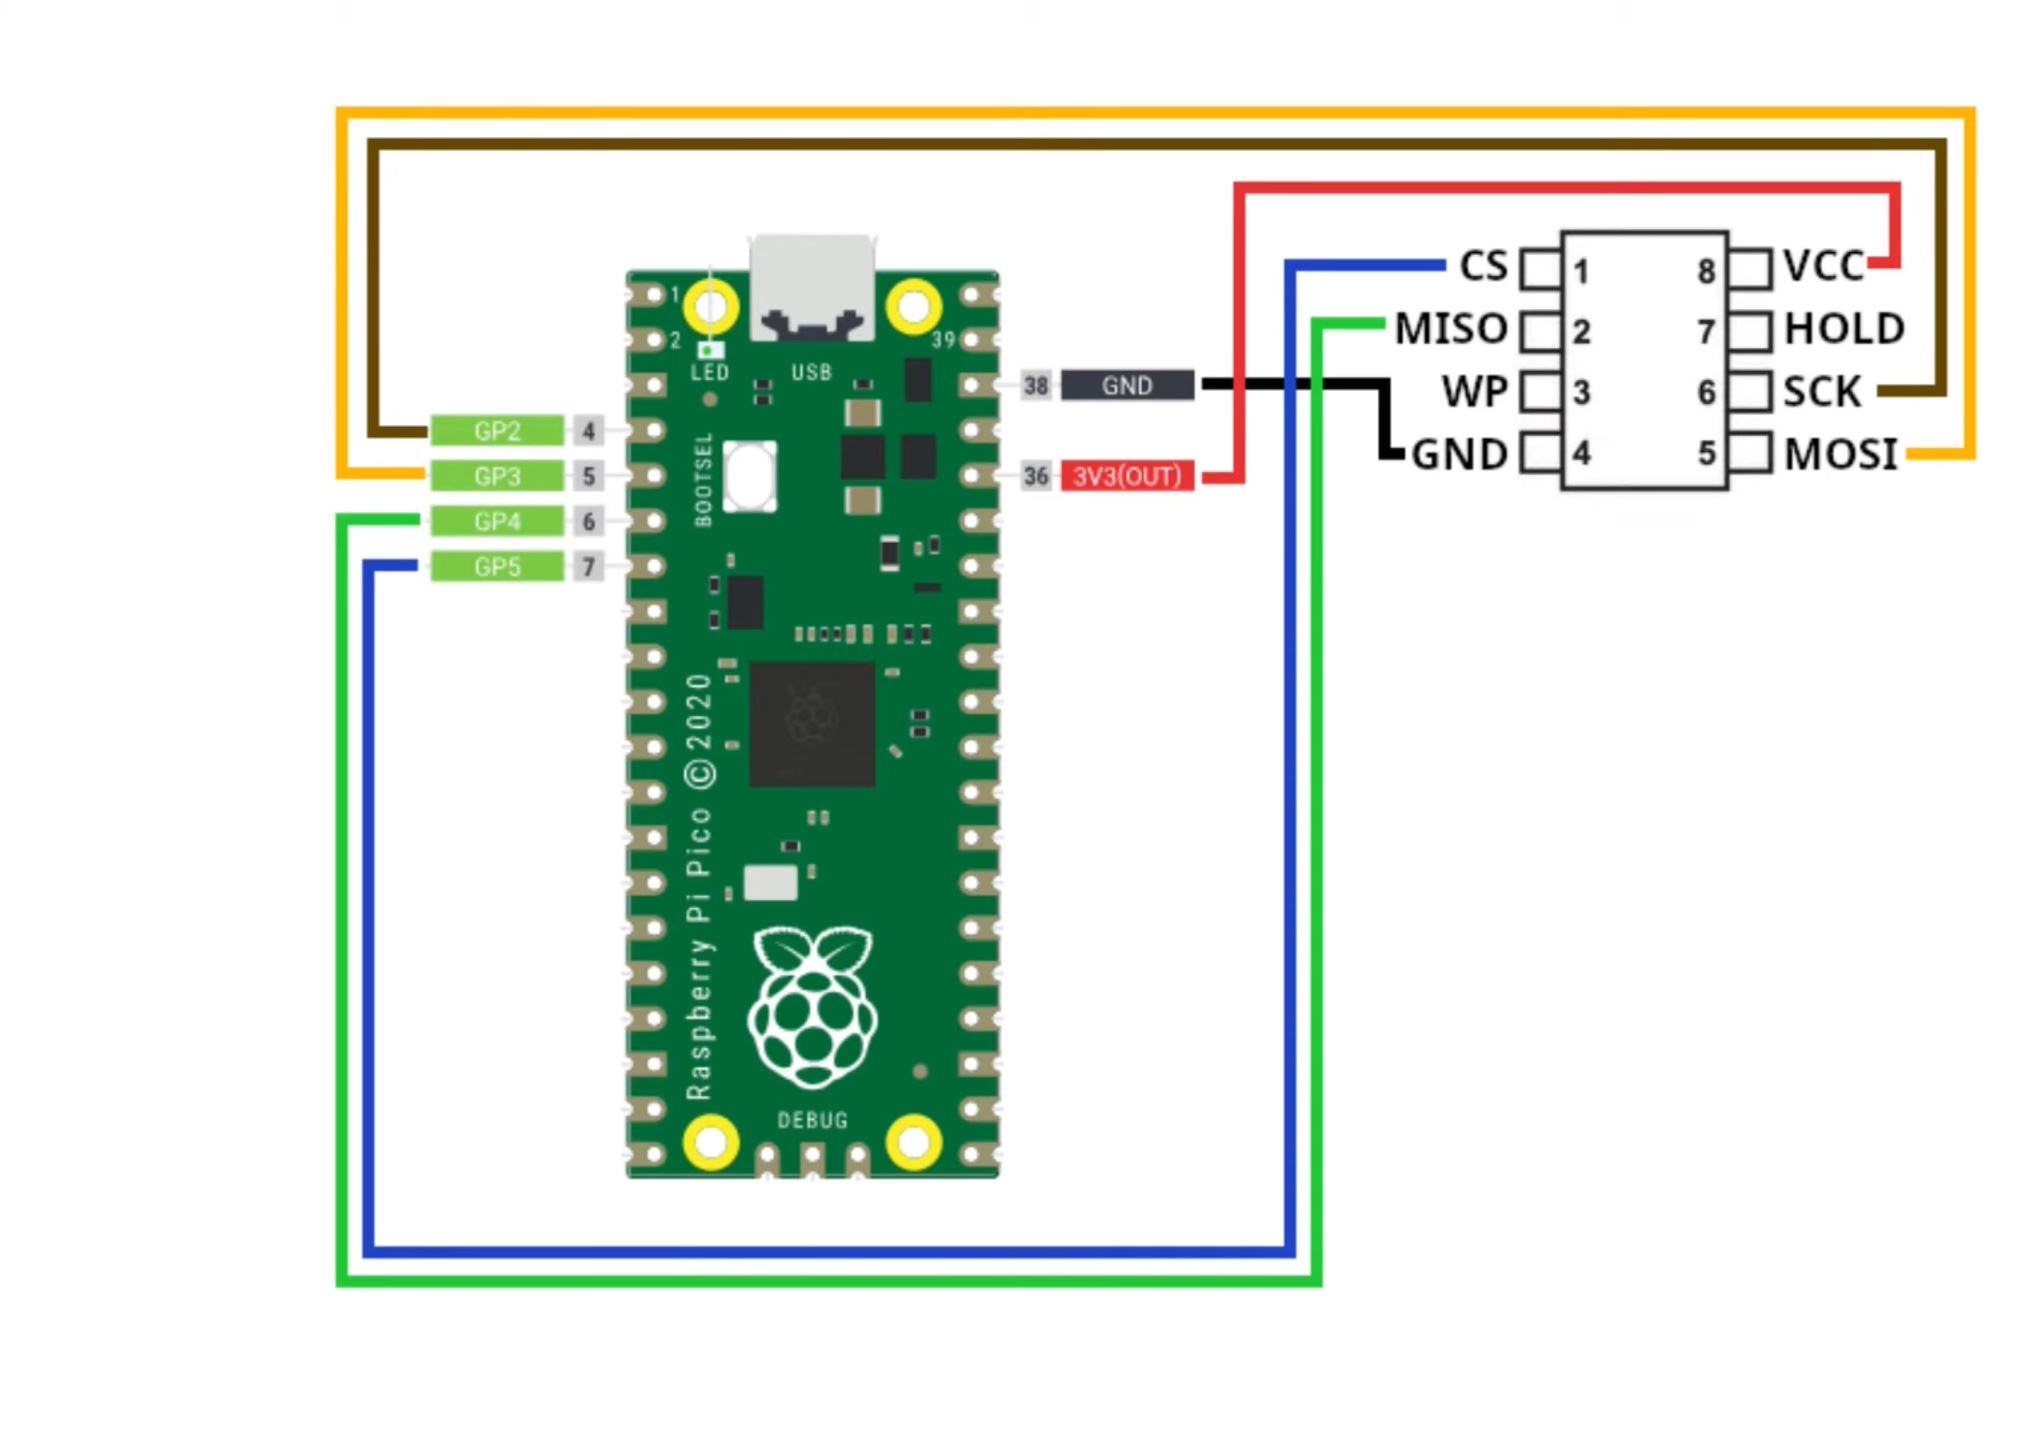 (Courtesy of Device Casting Couch)
Then attach it to the Thunderbolt chip, with the 1 pin at the top left:
Once we are at this point, plug in your USB cable to the Pico. Return to your computer, and run the following commands to validate a proper connection
between the Thunderbolt chip and your clip (replace ACM0 with whatever your device is named, as enumerated with dmesg earlier):
sudo ./flashprog -p serprog:dev=/dev/ttyACM0 -r ../../../t480tb1.bin
sudo ./flashprog -p serprog:dev=/dev/ttyACM0 -r ../../../t480tb2.bin
Input these files into a cryptographic hash utility and validate that they produce the same digest. If they do not, then you do not have a stable connection. Adjust your clip, and repeat this process until you do. Once a stable connection has been obtained, we erase the firmware on the chip with the following command:
sudo ./flashprog -p serprog:dev=/dev/ttyACM0 -E
We now create a file null.bin comprised of 1 MB of zeroes:
dd if=/dev/zero of=null.bin bs=1M count=1
Validate that the file does truly contain all zeros and is 1MB in size. Then, flash the chip with:
sudo flashprog -p serprog:dev=/dev/ttyACM0 -w null.bin
Of course, adapt ACM0 to whatever device you are using. At this point, connect the batteries once more, put the bottom cover on the machine, reinsert the external
battery, plug in the charger, and then power on your device. The machine should boot Lenovo’s firmware, albeit likely very slowly, so have patience. Once booted,
shut down the machine, unplug the battery, remove it, and then unplug the internal batteries once more. We will now flash the new Thunderbolt firmware to the chip.
It can be found in /vendorfiles/t480/tb.bin. We write it as follows:
sudo ./flashprog -p serprog:dev=/dev/ttyACM0 -w ../../vendorfiles/t480/tb.bin
Once this is complete, disconnect your flashing device and the clip, and reconnect the batteries. Replace the bottom panel and plug in the charger once again. This will cause the machine to boot once more, and it will restart itself a couple times. This is normal - just wait until you are able to get back into the BIOS once more, and the issue with Thunderbolt has been fixed.
We now progress to flashing Libreboot itself. Disconnect the charger, turn the machine off, disassemble the computer once more, and disconnect the same batteries. We find the BIOS chip here:
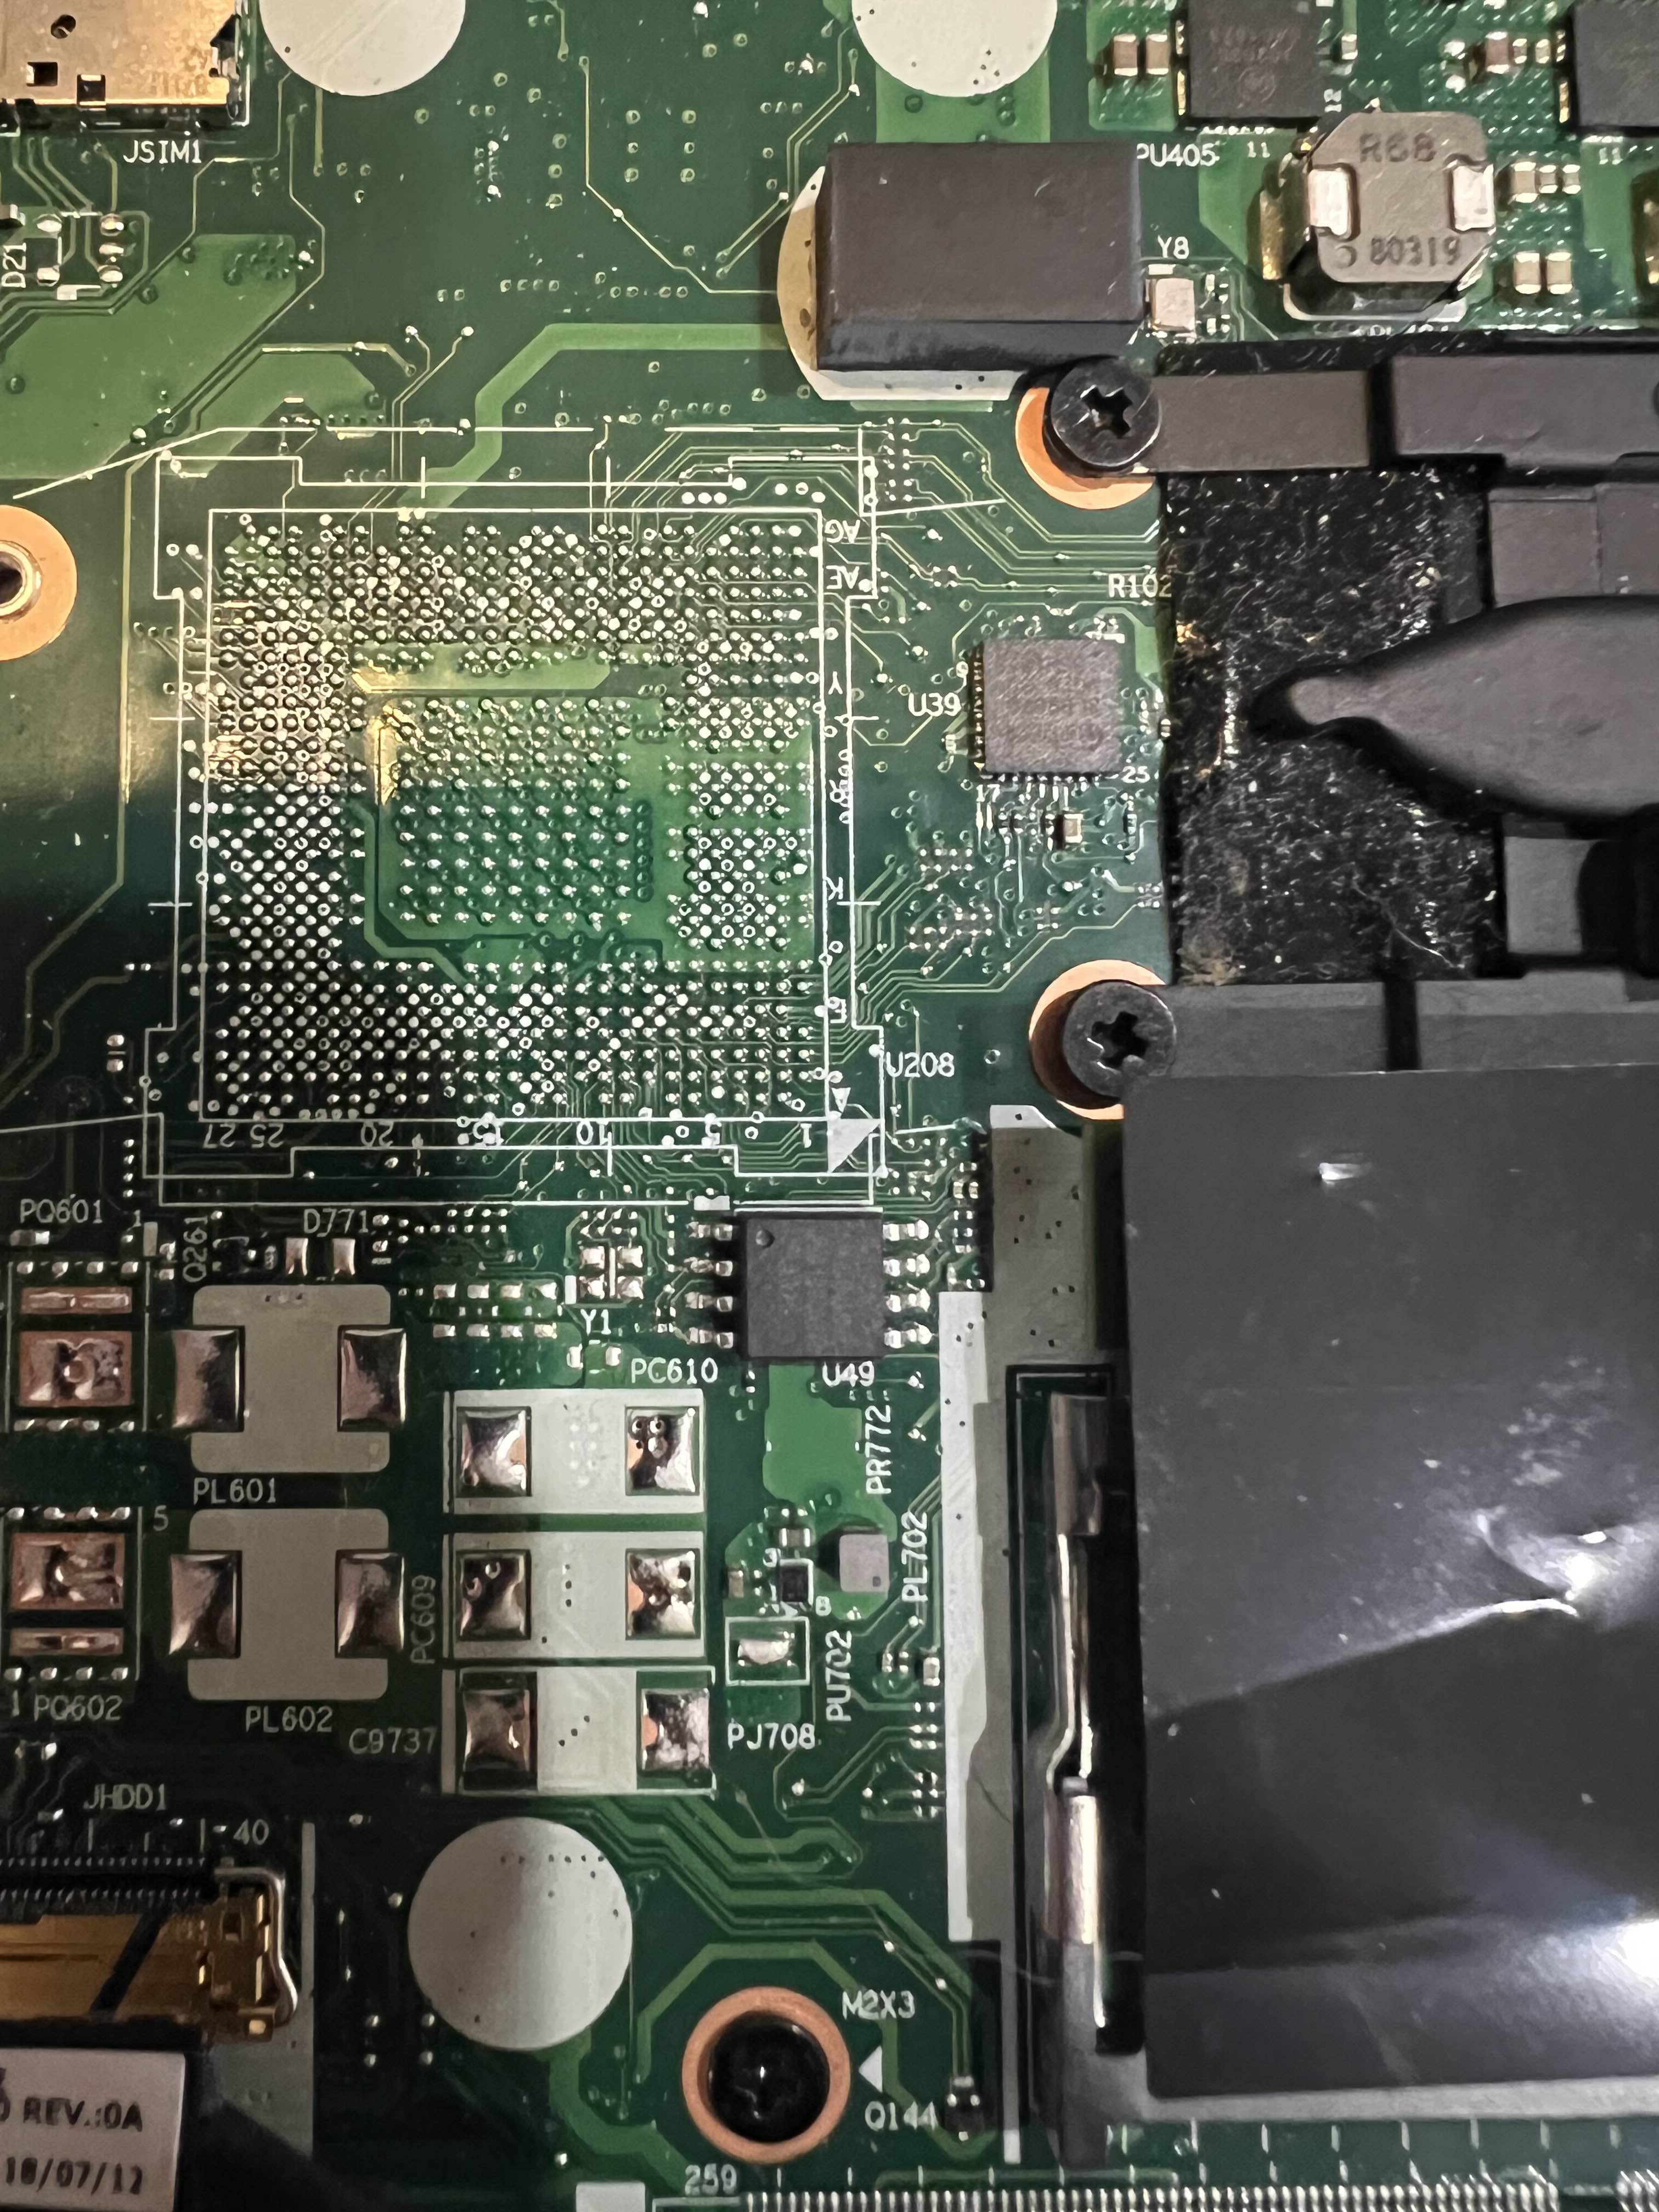
Connect the clip to this chip with the 1 pin on the top left part of the chip.
Then plug in your flashing device once more. We return to our other computer, and navigate to the lbmk folder. We extract the version of Libreboot that we will be using, then return to the flashprog directory. We then repeat our read step, this time with the T480 BIOS itself. This is accomplished with the commands (adjust your device):
sudo ./flashprog -p serprog:dev=/dev/ttyACM0 -r ../../../t480bios1.rom
sudo ./flashprog -p serprog:dev=/dev/ttyACM0 -r ../../../t480bios2.rom
Once again, compare the digests of these when put through a cryptographic hash. Once you have confirmed that the digests are identical (and thus that the chip is connected properly), we will now actually flash Libreboot. Recall your selection for which variant of Libreboot you want to install - as this is the point at which that matters. Enter the following command, replacing the final ROM file with your desired variant and ACM0 with your flash device.
sudo ./flashprog -p serprog:dev=/dev/ttyACM0 -w ../../bin/t480_vfsp_16mb/<targeted-version>.rom
This will take some time. Once it is complete, disconnect your flashing device, reconnect the batteries, reassemble the device, and turn on the device. It will take a while to boot - this is normal. Your BIOS/UEFI screen should now be replaced with either SeaBIOS or GRUB, and you have completed the process of flashing Libreboot. Congratulations!
Part 5: Aftermath and Other Considerations
For errata published by LibreBoot (which this guide attempts to properly cover by default) or information on troubleshooting, please consult the Libreboot post-installation guide. Once again, please consider hardening your Libreboot installation if that is part of your threat model. Additionally, if you used one of the normal payloads, please see the documentation on full-disk encryption. AES-256 is largely the recommended algorithm for this due to the inclusion of AES-NI on x86-64 CPUs, however, for those mistrustful, ChaCha20 is always a strong alternative. Furthermore, please take care to consider your key derivation function - Libreboot has taken pains in order to support the more modern argon2id and LUKS2 with modern variants. And, of course, run Void.
Concluding Remarks
I hope that this guide has been beneficial to those looking to flash Libreboot themselves, or simply informative for those curious about the Libreboot and the process of flashing it. Ideally, it will also help motivate others to flash Libreboot to their own machines, or, even better, contribute to it! Thank you for reading.